If you're looking for a cheap, fast and convenience way to transfer money from Australia to Malaysia or vice versa, or from anywhere else in the world, you come to the right place. I'm gonna guide you step by step.
Introducing TransferWise!

First, let me tell you why TransferWise is different from bank or other company like Western Union, World Remit or OrbitRemit.
This is the printscreen from TransferWise website at 11:20pm (Melbourne time). If you notice, when you send AUD1000 from Australia to Malaysia, you will be charged AUD6.95 as a fee and this fee is included in AUD1000 that you're about to send. And the recipient will get RM3335.14
Exchange rate is AUD1 = RM3.35849
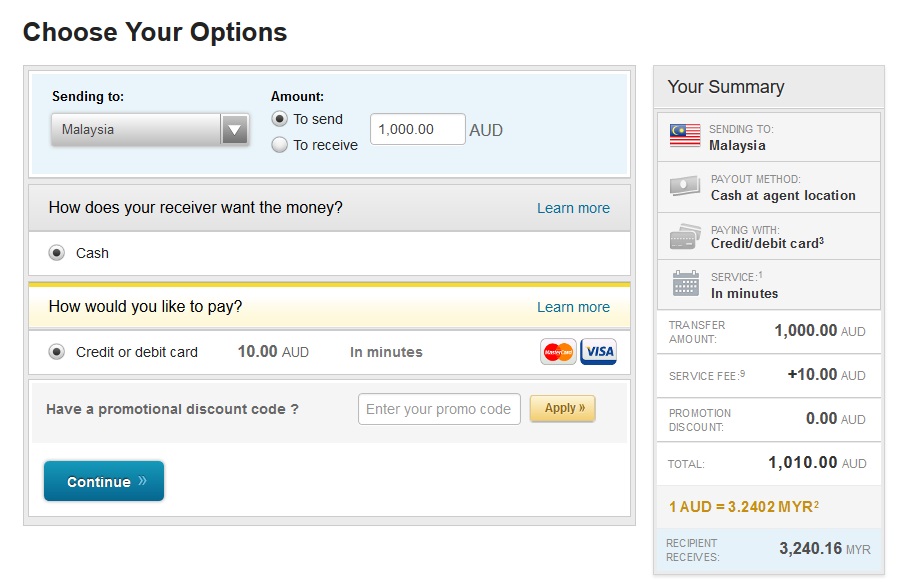
This is the printscreen Western Union website at 11:20pm (Melbourne time). The fee is AUD10 but not included in the amount of AUD1000 that you're about to send. With this extra AUD10 cost, the recipient will get RM3240.16
Exchange rate is AUD1 = RM3.2402

This
is the printscreen OrbitRemit website at 11:20pm (Melbourne time).
The fee is AUD4 (fixed and lower than TransferWise) but not included in the amount of AUD1000 that you're
about to send. With this extra AUD4 cost, the recipient will get
RM3319.60
Exchange rate is AUD1 = RM3.3196

This
is the printscreen WorldRemit website at 11:20pm (Melbourne time).
The fee is AUD13.99 (WHAT???) but not included in the amount of AUD1000 that you're
about to send. With this extra AUD13.99 cost, the recipient will get
RM3282.75
Exchange rate is AUD1 = RM3.28
So here's the summary for your better understanding:

With less cost, recipient will get a lot more with Transferwise because Transferwise always using real exchange rate. If you're trying to save cost on fee by using OrbitRemit fixed AUD4 fee, you still gonna losing some money because their exchange rate is not according to the real exchange rate.
Now that you know why Transferwise is good compared to the banks and any other company, its time for you to download and register the app.
You can search for this app in Apple Store or Google Play. However, if you don't have smartphone, you still can use this service by using their website.
Please follow this link to get FREE first transfer:
After you've signed up, you can start transferring money by following these steps. Please bear in mind my tutorial here is using TransferWise app on iPhone. If you're using Android or website, user interface might be slightly different.
When you launch the app and click at "Send" icon at the centre bottom of the app, you will be directed to this page.

You need to enter the amount you intended to transfer and TransferWise will show you how much the recipient is estimated to receive together with the fee that will be charged.
In this page, you can change the currency, and check for current rate.

Example of the currencies available.

Click on currency rate to see up and down of your selected currency.
Enough with the introduction. Let's transfer the money now.

Enter the amount you intended to send and click Send Money.

Add recipient

You can choose to send the money to your own account, someone else or business

If you want to send the money to your own account, just fill in your bank's account details such as SWIFT code and account number. Please google to see your bank's SWIFT code.

If you want to send the money to someone else, extra information are required.

After you've filled in recipient details, click Continue and this page will appear. Check the summary and if everything is okay, click Confirm

You have 3 options to pay for your transfer.

Add a new card if this is your first time transferring money using TransferWise.

Fill in all the details.

Please note on the small message regarding extra charge if you want to pay using credit or debit card. You will be charge extra 0.6% from the amount you intended to transfer.

To avoid 0.6% charge, I always use option no 2 which is Bank Transfer. By clicking on Bank Transfer on How To Pay menu, you will be directed to this page and click on I made this transfer.
You need to note down TransferWise bank account's details (Macquarie Bank) somewhere for the next step. Reference number is very important because that's considered as your TransferWise ID.

After you click at I made this transfer, this screen will appear and click Got It!
After that, login into your own internet banking and transfer the money as usual. Don't forget to put you reference number (your TransferWise ID) when you transfer money from your bank to TransferWise.

As soon as TransferWise received your money, you will receive a notification email. At this stage, you don't have to do anything. Just wait 2 to 3 business day for the money to be in the recipient account. For your information, Transferwise always promise the money to be in the recipient account in 5 to 6 business days. I guess they just want to play safe. But in real situation, the transfer will be completed in less than 3 business days.
Again, if you want to transfer money using Transferwise, please sign up using this link to get FREE transfer for first time.
Many people in this region have always sort for better and easier channels of transferring or sending money other than going to bank to queue or to get token from the bank for online money transfer transactions, without knowing that there is a platform that can even do much better without any stress in carrying out such transaction almost instantly. Money Send
ReplyDeleteYou make so many great points here that I read your article a couple of times. Your views are in accordance with my own for the most part. This is great content for your readers. money converter
ReplyDeleteThis post is great and wonderful, thanks for sharing with us. I also want to share an information with you guys, if there is anyone that is looking on how to set up his or her cash app, you can read through it, clicking on the link.
ReplyDelete